
Your first move is producing two separate, single-page PDFs: one for the interior, one for the cover, both built to PDF/X‑1a:2001 or PDF/X‑3:2002 standards. Every font must be embedded, every page needs a small bleed where specified, and text needs a recommended safety margin from the trim edge. Before you do anything else, download the cover template for your exact trim size and page count, then run a preflight check on both files.
TL;DR:
- Authors should use separate, standards-compliant PDFs for the interior and cover, with all fonts embedded and no printer or registration marks.
- Proper setup of margins, bleed, and spine width is crucial for print accuracy, especially for spine text and barcode placement.
- Export files using PDF/X‑1a:2001 or PDF/X‑3:2002 presets, verifying all fonts are embedded, color is CMYK, and transparency is flattened.
- The file rejection rate drops significantly when authors conduct a thorough preflight check focusing on page size, bleed, margins, fonts, and image resolution.
- Using automated tools like Alhora can help prevent common mistakes, ensuring files meet IngramSpark specifications before upload.
Table of Contents
- IngramSpark Print Formatting Checklist Before You Upload
- How Do You Set Up the Interior File Correctly?
- Building a Cover File IngramSpark Won't Reject
- Exporting a Print-Ready PDF Without Guesswork
- Why Did Your IngramSpark Upload Get Rejected?
- What Should You Check Before Ordering Full Print Runs?
- How Alhora Reduces IngramSpark File Rejections
- When Should You Format the File Yourself?
- Try Alhora for Your Next IngramSpark Export
- Sources
IngramSpark Print Formatting Checklist Before You Upload
Most rejected files fail for the same handful of reasons, and almost all of them are catchable before you ever hit "submit." Run through this list with your actual PDF open in Acrobat, not just your layout software's export preview.
- Interior and cover are separate files. IngramSpark does not accept a combined PDF with cover and interior in one document.
- No spreads. Every page in the interior file must be single-page (1-up), not laid out as two-page spreads, even for illustrated books.
- No crop marks, registration marks, or printer marks. These confuse the print engine and are a top cause of rejected files, according to IngramSpark's own print book file guidelines.
- PDF/X‑1a:2001 or PDF/X‑3:2002 compliance, with all fonts embedded or embedded subset, not just referenced.
- Correct bleed and margin numbers: 0.125" bleed on interior outer edges, 0.5" minimum safety margin, and wider margins for thick books (more on that below).
- 300 ppi images in CMYK for covers, and grayscale conversion for black and white interiors.
- Barcode space reserved on the back cover, spine text sized correctly for the spine width, and no text crowding the trim edge.
- Clean file names with no special characters, spaces replaced with underscores or hyphens, and clear version numbers so you and IngramSpark both know which file is current.
Pro Tip: Keep a version log outside the file names too, a simple spreadsheet row for each upload noting the date, what changed, and whether it passed. When you're three revisions deep at 11 p.m. trying to fix a barcode issue, that log saves you from re-uploading the wrong file.
A disciplined preflight that checks eight specific items, trim size, document size, bleed, embedded fonts, image resolution, color mode, barcode placement, and page count parity, resolves the overwhelming majority of the issues authors run into during IngramSpark's own file review process. Treat that list as your baseline, not an afterthought you check once files are already exported.
How Do You Set Up the Interior File Correctly?
The interior file is where most first-time IngramSpark submissions go wrong, mostly because authors build at the wrong trim size or forget that print margins behave differently than screen margins. Start by locking in your trim size before you touch a single formatting setting. If you haven't settled on a size yet, work through the trade-offs between common trim sizes first. Everything downstream, margins, gutter, font size, depends on that decision.
Margins, gutter, and bleed
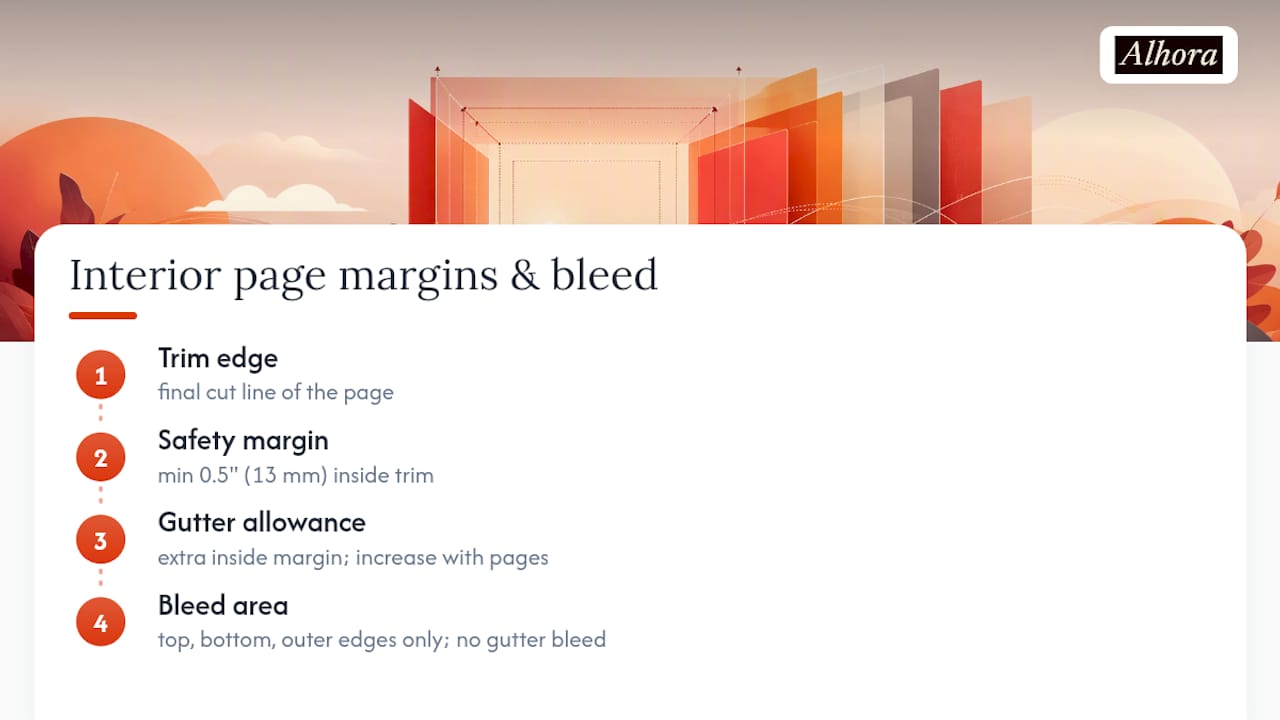
Your safety margin needs to be a minimum of 0.5" (13 mm) inside the trim edge on every side. That's the buffer that keeps text from getting sliced during trimming or crowded against the spine. But 0.5" is a floor, not a target for every book. Thicker books need additional gutter margin on the inside edge, since a thick spine physically curves the page near the binding and eats into your readable area. Add extra gutter allowance as page count climbs, or your inside margins will look uncomfortably tight once the book is bound.
Bleed only applies to the top, bottom, and outer edge, never the gutter side. IngramSpark's spec calls for a small standardized bleed on those three outer edges for any interior element that needs to run to the edge of the page, chapter dividers with color blocks, full-bleed images, that sort of thing. If your interior is straight text with no bleed elements, you technically don't need bleed at all, but building it in anyway costs nothing and protects you if you add a design element later.
Pagination and page count
IngramSpark stores page counts as even numbers, so if your manuscript lands on an odd count, expect a blank page added at the end. Don't panic when you see that in your proof. It's expected behavior, not an error. Page count also determines spine width, which determines your cover template dimensions, so lock your interior pagination before you start building the cover.
Images, color, and fonts
For black and white interiors, convert any images to grayscale before placing them. Color images that look fine on screen frequently print as a muddy gray if the interior is set up as black and white, and IngramSpark's ingestion system may flag or reject files with unexpected color content in a grayscale interior. Avoid spot colors and skip embedding ICC profiles in the interior file. They add file weight and cause inconsistent rendering across printers.
Font embedding is where a surprising number of authors get tripped up, usually without knowing it. Open your exported PDF in Acrobat, go to File, then Properties, then the Fonts tab. Every font listed should say Embedded or Embedded Subset. If anything says just the font name with no embedded tag, that font isn't included in the file, and IngramSpark's system will likely flag it. This single check catches one of the most common, and most invisible, causes of upload rejection.
- Build your layout at final trim size from the start, never scale up from a draft size later.
- Confirm grayscale conversion on every image before export, not just the cover.
- Check the Fonts tab in Acrobat before every single upload, even revisions.
The interior style guide for novels covers pagination and typography details that go beyond IngramSpark's bare minimums, worth a look if you're formatting fiction specifically.
Building a Cover File IngramSpark Won't Reject
Your cover is one continuous PDF wrapping front, spine, and back, not three separate pieces stitched together in your head. Getting the dimensions right by hand is nearly impossible once spine width enters the equation, which is why skipping the template is the single most common cause of cover rejections.
- Generate your template first. Use IngramSpark's Cover Template Generator with your exact trim size, page count, and paper type. It calculates spine width automatically and outputs a template sized precisely for your book, so you're never guessing at spine dimensions.
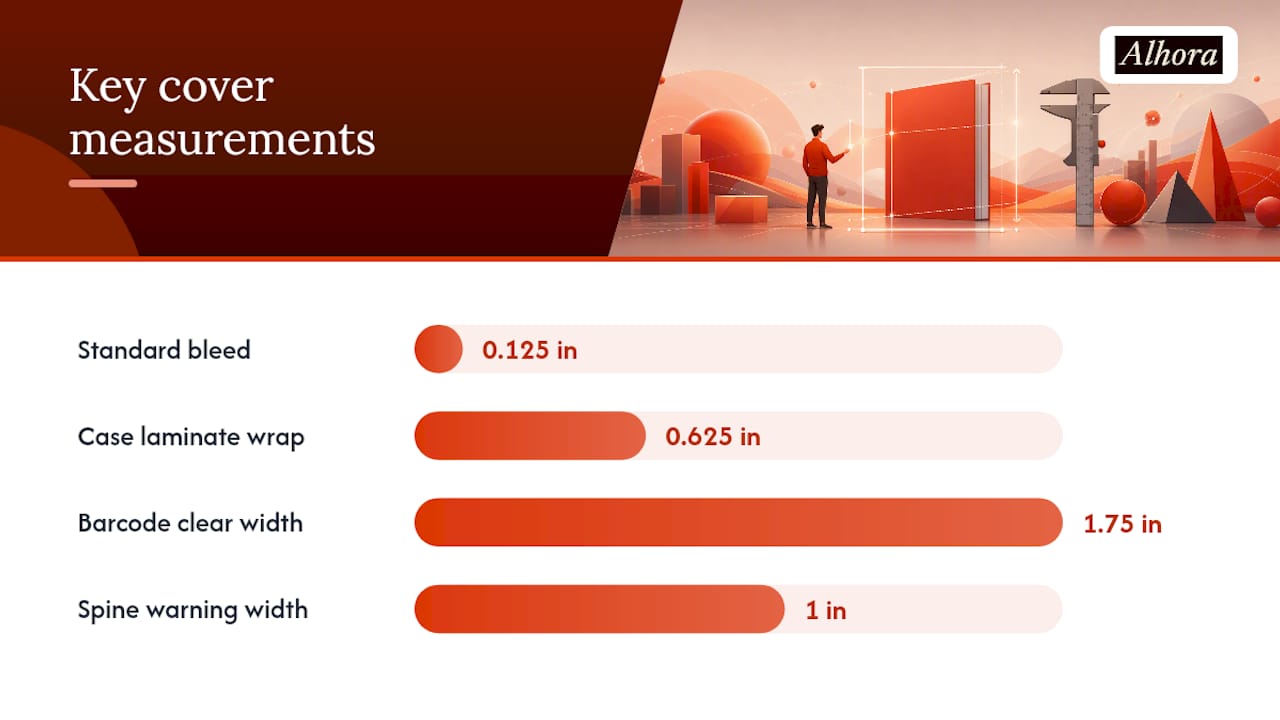
- Add bleed correctly. Standard covers need 0.125" of bleed on all sides. Case laminate (hardcover) wraps require a much larger 0.625" wrap allowance to cover the board edges, so check your binding type before assuming the standard bleed number applies.
- Reserve barcode space. Leave a clear 1.75" by 1" area on the back cover, printed in 100% black CMYK with no background pattern or image behind it. A busy background behind the barcode is a common, avoidable rejection cause.
- Respect spine text rules. Paperbacks under 48 pages shouldn't carry spine text at all since the spine is too narrow for legible type. Thicker spines need type kept a safe distance from the front and back panel folds, which the template's spine-safe guides will show you.
- Run your final checks. Confirm CMYK color mode throughout, images at 300 ppi, all fonts embedded, and absolutely no crop or printer marks anywhere in the file.
Pro Tip: If your spine width comes out under an inch, resist the urge to shrink your title font to make it fit. Reflow the spine text vertically instead, or drop a subtitle. Cramped spine text is one of the fastest ways to make a self-published book look self-published.
Handling ISBN and barcode metadata inside the cover file itself is simpler than it sounds: the barcode area you reserve is where IngramSpark's system places the actual scannable barcode encoding your ISBN and price during processing. You don't need to generate or place the barcode graphic yourself. You just need to leave that space genuinely empty and correctly sized.
Exporting a Print-Ready PDF Without Guesswork
Your layout software's export dialog is where most of the technical requirements either get satisfied automatically or quietly ignored, depending on which preset you choose. Pick PDF/X‑1a:2001 if your software offers it as a named preset; it forces CMYK color, strips out unsupported transparency, and embeds all fonts by default. PDF/X‑3:2002 is the acceptable alternative and allows a slightly wider color handling range, but functionally solves the same problems.
PDF/X export presets embed fonts and lock down color space automatically, which is exactly why they prevent the majority of standard ingestion rejections that plague authors exporting with a generic "Save as PDF" setting instead.
- Choose CMYK, never RGB, for anything containing images or color elements.
- Flatten transparency on complex layered images before export rather than trusting your software to handle it silently.
- Strip out any crop, registration, or printer marks your software adds automatically. Most page layout tools default to including these unless you explicitly turn them off.
- Rasterize unusually complex vector art if your export keeps producing oversized or corrupted files. Overly complex vector paths are a surprisingly frequent cause of file corruption on upload.
- Rename your final file with no special characters, no spaces if you can avoid it, and a clear version number.
Once exported, don't just eyeball it. Run Acrobat's Preflight tool (under Print Production) to check document size against your intended trim plus bleed, verify every font shows as embedded, confirm the color profile is CMYK throughout, and scan for corrupt or malformed objects. This five-minute check catches problems your eyes will miss on screen.
Why Did Your IngramSpark Upload Get Rejected?
When IngramSpark's system flags a file, the error message rarely tells you exactly what's wrong in plain language. Here's how to translate the most common ones into a fix.
- "File appears corrupt" or won't open. Usually means an incomplete export or a compatibility issue with your PDF version. Re-export from your original layout file rather than trying to repair the PDF itself.
- "Fonts not embedded." Go back to your source file, confirm every font is either fully licensed for embedding or swap to one that is, and re-export using a PDF/X preset rather than a generic PDF export.
- "Document size incorrect." Your trim size plus bleed doesn't match what you selected during setup. Recheck your page setup dimensions against your intended trim, and rebuild your cover from the Cover Template Generator if the mismatch is on the cover file.
- Barcode-area issues. Something, usually a background image or design element, is overlapping the reserved barcode space. Open the file page by page in Acrobat and check the back cover panel specifically.
- Wrong file uploaded to the wrong slot. Sounds obvious, but uploading your cover file into the interior slot happens often enough that IngramSpark addresses it directly in their own troubleshooting guidance. Double-check file names against upload fields before confirming.
If a rejection message still doesn't make sense after you've inspected the file yourself, contact IngramSpark support and include your title ID, the exact error text, and the file names involved. That specificity gets you a faster, more useful answer than a general "my file won't upload" message.
What Should You Check Before Ordering Full Print Runs?
Never skip the proof stage, even on your fifth book. A proof catches things your screen simply can't show you: how a color actually renders on paper, whether your spine text lines up once the book is physically bound, whether your margins feel right in hand rather than in theory.
- Run a final preflight pass covering font embedding, document size, margins, bleed, image resolution, and barcode placement, all before you place the order.
- Order a printed proof through your IngramSpark account rather than approving for full distribution sight unseen.
- Check the proof for trim variance, meaning does the physical trim match your intended dimensions within normal tolerance, and inspect for color shifts between your on-screen file and the printed page.
- Verify spine alignment, confirming your spine text sits centered and the wrap lines up cleanly with the front and back panels.
- If you upload a revision, use clear version numbers in your file names. IngramSpark's system replaces the previous file, but sloppy naming makes it easy to lose track of which version is actually live.
Pro Tip: Compare your printed proof against your screen in natural daylight, not under your desk lamp. Screen color and print color diverge most in warm-toned lighting, and that's exactly when authors get spooked about a color shift that isn't really there.
If you've gone through two or three rounds of proofs and you're still fighting the same formatting error, that's usually the point where outsourcing the layout work starts costing less than your time. The proofing checklist for self-publishers walks through what to inspect in more detail if you want a second pass before ordering.
How Alhora Reduces IngramSpark File Rejections
Most of the errors covered above come from the same root cause: manual layout software gives you the tools to build a compliant file, but it doesn't stop you from building a noncompliant one. Alhora's typesetting engine handles justification, hyphenation, and widow and orphan control automatically as you write, so the layout issues that usually surface only after export get caught while you're still working.
Automated validation checks against bleed, safety margins, font embedding status, and export presets built around PDF/X compliance rather than a generic PDF save are run. That means the file you export is already structured to match what IngramSpark's file creation guide asks for, rather than something you're reverse-engineering after a rejection notice.
- Automatic typography handling reduces the manual layout errors that cause spacing and pagination problems.
- Built-in checks flag bleed, margin, and font-embedding issues before export, not after upload.
- Interior and cover exports align with IngramSpark's own template dimensions, cutting down on the mismatch errors that trigger rejections.
- Common manuscript formats import directly, so you're not rebuilding a layout from scratch just to fix one formatting standard.
The gap between "a file that opens fine on your computer" and "a file IngramSpark accepts without a rejection notice" is almost always a handful of invisible settings: embedded fonts, exact bleed measurements, the right PDF standard. Catching those automatically, before export, is worth more than any checklist you read after the fact.
Alhora's guide to bleed and trim marks breaks down the design mechanics behind these settings if you want the "why" behind the numbers, not just the checklist.
When Should You Format the File Yourself?
DIY formatting makes sense when your book is straight text, you're comfortable with margins and export settings, and you have time to run two or three proof rounds without a hard deadline looming. It stops making sense the moment your book has complex interior design, images, or footnotes, or your timeline can't absorb a rejected upload and a week's turnaround on the fix.
A platform like Alhora sits in the middle: faster than pure DIY, cheaper than hiring a professional formatter, and it catches the invisible errors, unembedded fonts, wrong bleed, that cause most rejections. Hiring a formatter still makes sense for highly designed books, illustrated children's titles, or anything with layout complexity beyond standard fiction or nonfiction.
Ask yourself three questions before choosing a route: How complex is my interior design? How much time do I have before I need this live? How much rejection risk can I actually tolerate? Your answers point you toward DIY, a tool, or a professional, in that order of increasing cost and decreasing risk.
— James
Try Alhora for Your Next IngramSpark Export
This software provides export presets, font-embedding checks, and margin and bleed rules that are integrated into the workflow, helping produce a compliant IngramSpark file more efficiently than hand-building one in generic layout software.
The software offers PDF/X-aligned export presets, automatic font-embedding verification, and interior and cover templates sized to match IngramSpark's specifications, along with a typesetting engine that handles hyphenation, justification, and widow and orphan control during writing. If you're weighing tools for a manuscript that also needs to reach retailers beyond print, the ebook formatting software page covers how the same manuscript exports across formats without rebuilding your layout twice. Authors also exploring complementary writing tools might look at novel with ai for the drafting side of the process.
Import your manuscript into Alhora and run a sample export against your actual trim size and page count. Seeing your own file pass a preflight check tells you more than another checklist ever will.