
IngramSpark accepts only PDF/X-1a:2001 or PDF/X-3:2002 interior and cover files. Every font must be embedded, images need to be CMYK at 300 ppi, and interiors require a single-page PDF with 0.125 inch bleed on the top, bottom, and outside edges plus a 0.5 inch safety margin. Page counts must land on an even number, since IngramSpark appends its own barcode page, and the barcode itself has to print in solid black with no color interference.
TL;DR:
- Files must be PDF/X-1a:2001 or PDF/X-3:2002 with embedded fonts and CMYK images at 300 ppi or higher, avoiding RGB and unembedded fonts.
- Interior page counts must be even, with a single-page PDF design, 0.125-inch bleed on top, bottom, outside, and a 0.5-inch safety margin for critical content.
- Cover templates are generated based on exact dimensions, and all artwork must include 0.125-inch bleed, with the barcode area kept in solid black on a light background.
- Common rejections stem from unembedded fonts, RGB images, and spread-view files; preflight checks and consistent exports as PDF/X prevent mistakes.
- Automating validation with tools like Alhora ensures compliance with IngramSpark specs, reducing manual rechecks after manuscript edits.
Table of Contents
- What Are IngramSpark's Interior PDF Specs?
- What Are IngramSpark's Cover PDF Specs?
- How Do You Handle Fonts, Color, and Images Correctly?
- Where Do You Get IngramSpark's Templates and How Do You Upload Files?
- Why Do IngramSpark Files Get Rejected, and How Do You Fix Them?
- How Alhora Validates IngramSpark-Ready Files
- Final Pre-Upload Checklist for IngramSpark
- The Real Problem Isn't the Spec Sheet
- Ready to Export a Print-Ready File Without the Guesswork?
- Sources
What Are IngramSpark's Interior PDF Specs?
Getting the interior file right starts with the file format itself, not the layout. IngramSpark's ingestion system reads PDF/X-1a:2001 or PDF/X-3:2002 files because both standards force color and font data to travel inside the PDF rather than referencing outside resources the printer's system might not have. A regular PDF export from Word or InDesign will not automatically meet this standard. You have to choose the PDF/X preset during export, and most professional layout tools have one built in.
Font embedding trips up more authors than almost anything else on this list. If even one font in your manuscript isn't embedded, IngramSpark's system can substitute a default font mid-print, and suddenly your carefully kerned chapter headings look like a ransom note. Check the Fonts panel in Adobe Acrobat before you submit anything. It lists every typeface in the document and flags whether each one is embedded, subset, or missing.
The interior file also needs to be a single-page (1-up) PDF, not a spread-view document showing two pages side by side. Design software sometimes defaults to spreads for editing convenience, and forgetting to switch back before export is a common, easily fixed mistake.
Page count matters more than most authors expect. IngramSpark tacks on a barcode page as the final page of your interior, and the stored file needs an even page total once that happens. If your manuscript lands on an odd number, a blank page gets inserted automatically before the barcode page, which can throw off your chapter-opening pagination if you were counting on a specific layout.
Margins and image quality round out the interior checklist:
- Bleed: 0.125 inch (3 mm) on the top, bottom, and outside edge only, never the gutter side.
- Safety margin: 0.5 inch (13 mm) inside the trim for any text or critical image content.
- Image resolution: 300 ppi for continuous-tone photos and illustrations; bump that to 600 ppi for 1-bit black-and-white line art like pen sketches.
- Color mode: CMYK throughout, never RGB, since RGB files print with unpredictable color shifts.
- Total ink: keep combined ink coverage under roughly 240 percent, and use 100 percent black only, no CMYK mix, for body text under 24 point.
Pro Tip: Grayscale interiors should stay in true grayscale mode, not CMYK with equal channel values. Converting a black-and-white manuscript to CMYK often introduces a faint color cast that shows up as muddy gray on press.
What Are IngramSpark's Cover PDF Specs?
Cover files fail more often than interiors, mostly because authors try to build them from scratch instead of starting with IngramSpark's own template. Request one through the Cover Template Generator inside your account portal by entering your exact trim size, page count, and paper type. The tool calculates your spine width using a mod2 formula and hands you a template with the barcode area, spine boundaries, and bleed lines already marked.
Follow these steps once you have the template downloaded:
- Open the template in your design software and set your document dimensions to match it exactly. Even a fraction of an inch off will misalign your cover artwork against the die-cut trim.
- Build your artwork inside the template's guide layers rather than eyeballing measurements from a spec sheet.
- Keep all cover bleed at 0.125 inch (3 mm) on all four sides, except for case laminate hardcovers, which need a much larger 0.625 inch (16 mm) wrap around the board edges.
- Flatten the file before export and strip out the template's own crop marks and layer guides. Submitting a file that still shows the template's registration marks is a frequent, avoidable rejection cause.
- Export using a PDF/X preset, the same standard required for interiors.
Spine text has its own rule set. Perfect bound books under 48 pages generally don't have enough spine width to safely print readable spine text at all, so IngramSpark's template will often omit that guide for thin books. As spine width increases, the safe zone for spine text tightens proportionally. Trust the template's built-in guides rather than guessing at pixel positions.
A few points worth double checking before you finalize the cover:
- The barcode occupies a reserved area, typically around 1.75 by 1 inch, in the location your template designates. Do not move or resize it.
- Keep the barcode in pure black on a white or very light background for scannability.
- Cover text should sit at least 0.25 inch (6 mm) inside the trim edge, separate from the bleed measurement.
Trim size choice affects every one of these calculations, so it helps to lock that decision in early if you're still weighing book trim sizes against your genre and page count.
How Do You Handle Fonts, Color, and Images Correctly?
Font embedding failures usually trace back to one of two causes: a font family that restricts embedding at the license level, or a "base 14" font like Times or Helvetica that your software assumes is already installed on every system and skips embedding by default. Neither assumption holds for a print vendor's ingestion server. Open the file in Acrobat, check Document Properties, then Fonts, and confirm every typeface reads as "Embedded Subset" rather than just listed by name.
Spot colors are another quiet killer. If your cover design came from a source that used Pantone spot colors, convert every one of them to CMYK before export. IngramSpark's presses print CMYK process color, and an unconverted spot color can shift wildly or print as an unexpected gray. While you're in there, strip any embedded ICC color profiles from the final export. Profile mismatches between your software and the print RIP are a common source of unpredictable color output.
Complex vector art with layered transparency effects, glows, or drop shadows should get flattened before final export rather than left as live effects. Transparency that renders correctly on your screen can behave unpredictably once it passes through a PDF/X conversion.
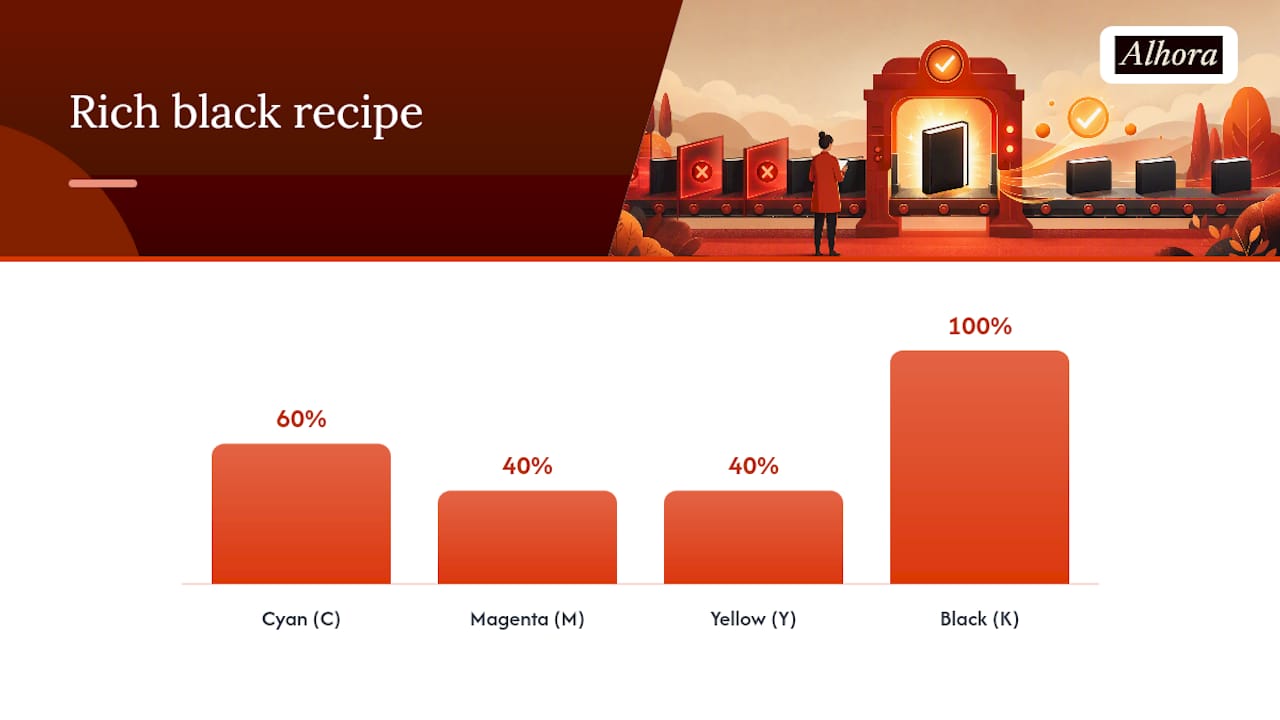
For rich black text or backgrounds, use this recipe: C:60 M:40 Y:40 K:100. Avoid "registration" black (C:100 M:100 Y:100 K:100), which is a prepress mark color meant for printer alignment, not final artwork. It prints muddy and can bleed through thin paper stocks.
Pro Tip: Run Acrobat's Preflight tool (Print Production menu) before every submission. It flags unembedded fonts, RGB images, and low-resolution art in one pass, catching most rejection causes in under a minute.
A quick pre-export checklist:
- Fonts embedded and confirmed in the Fonts panel
- No spot colors remaining, ICC profiles removed
- Transparency flattened
- Rich black recipe applied, no registration black anywhere
Where Do You Get IngramSpark's Templates and How Do You Upload Files?
Two official resources anchor every submission: the File Creation Guide, which lays out every dimension and color spec in one PDF, and the Cover Template Generator, which builds a custom template once you enter trim size, page count, and paper choice. Order a fresh template any time you change page count meaningfully, since spine width shifts with it.
Upload happens through the web portal, and IngramSpark accepts interior and cover files as separate PDF uploads rather than a combined package. Keep these details in mind before you submit:
- Upload interior and cover files into their correct, separate slots. A cover file submitted into the interior slot will fail ingestion immediately.
- Make sure your listed trim size and page count in the metadata match what's actually built into the PDF. Mismatches between the stated specs and the file itself are a fast track to rejection.
- Name files simply: letters, numbers, hyphens, and underscores only. Special characters, spaces, and accented letters in file names frequently cause upload or ingestion errors.
- Check file size before upload. Extremely image-heavy interiors can balloon past reasonable limits, so flatten and optimize images rather than embedding oversized originals.
A pre-upload proofing pass catches most of these mismatches before they ever reach the portal.
Why Do IngramSpark Files Get Rejected, and How Do You Fix Them?
Most rejections trace back to a short list of repeat offenders. Community reports from self-publishing and typesetting forums consistently point to three culprits: unembedded fonts, images left in RGB instead of CMYK, and interior files submitted as page spreads instead of single pages.
Work through this diagnostic sequence when a file bounces back:
- Page through the entire PDF visually first. Look for shifted text, missing images, or spread-view pages where single pages should be.
- Run Acrobat's Preflight tool and read every flagged warning, not just the errors.
- Open the Fonts panel and confirm full embedding on every typeface used, including any in headers, footers, or drop caps.
- Check each image's color mode and resolution individually if Preflight flags a color issue.
- Re-export as PDF/X after fixing the underlying problem, rather than patching the existing file.
If you've run through this sequence twice and the file still won't process, that's when contacting IngramSpark support makes more sense than repeated guessing. A dedicated preflight checklist run before your first submission saves that back-and-forth entirely.
How Alhora Validates IngramSpark-Ready Files
Alhora is a book-formatting studio built for authors moving manuscripts toward print and ebook release across Mac, Windows, Linux, and ChromeOS. Its typesetting engine handles justification, hyphenation, and widow and orphan prevention automatically, and its AI-assisted checks flag issues like missing font embeds, bleed miscalculations, and PDF/X compliance gaps without ever rewriting your text.
Pro Tip: Run your manuscript through automated font-embedding and bleed checks before your first IngramSpark upload attempt. Catching a spine-width miscalculation on your desktop costs you nothing; catching it after a rejected upload costs you a processing cycle.
Final Pre-Upload Checklist for IngramSpark
- Match document size to your ordered template exactly.
- Confirm bleed and safety margins.
- Verify every font shows as embedded.
- Run preflight for color mode and resolution.
- Export as PDF/X, single-page, even page count.
- Check barcode placement and color.
- Name files with no special characters.
- Upload interior and cover into correct slots.
- If rejected, re-export the full file and resubmit.
The Real Problem Isn't the Spec Sheet
Most rejected IngramSpark files don't fail because an author skipped the File Creation Guide. They fail because the author read it once, applied it by hand, and then changed something in the manuscript three weeks later without redoing the export checks. A trim size gets adjusted, a font gets swapped for the cover, and nobody rechecks embedding or bleed before the next upload.
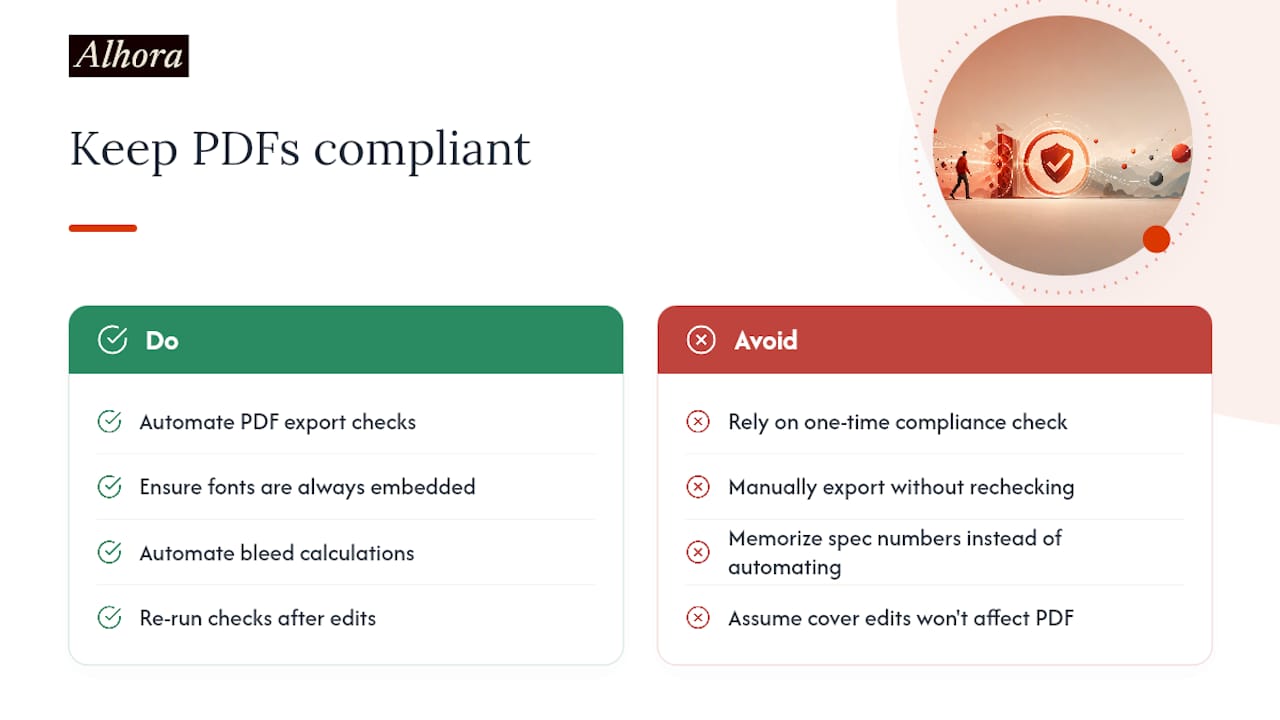
That's the gap conventional advice misses. Spec compliance isn't a one-time gate you pass and move past. It's a state your file has to hold through every subsequent edit, and manual PDF export makes that state fragile. The fix isn't memorizing more values from the spec sheet. It's removing the manual re-checking step entirely, so every export carries the same embedded fonts, the same bleed math, and the same PDF/X compliance regardless of what changed upstream in the manuscript.
Prioritize automating the checks you're most likely to forget after a late-stage edit, font embedding and bleed calculation top that list, over memorizing every ink density number by heart.
— James
Ready to Export a Print-Ready File Without the Guesswork?
Alhora handles the technical specification work that trips up most self-published authors before their files ever reach IngramSpark. Instead of manually rechecking bleed, embedded fonts, and PDF/X compliance every time you edit your manuscript, Alhora's typesetting engine keeps those checks current automatically, so your export stays upload-ready even after a late revision.
The platform suits authors managing a single title or a full series who want export files that meet IngramSpark's document standards without hand-checking every value against a spec PDF. Its AI-assisted checks flag font and color issues without touching your prose, and its import tools bring in manuscripts from Word or other formats in minutes. If you're preparing a print run soon, start by importing your manuscript into Alhora and running a validation pass before your next IngramSpark upload.